Adobe Photoshop CS6 is a popular image editing software that provides a work environment consistent with Adobe Illustrator, Adobe InDesign, Adobe ImageReady, and other products in the Adobe Creative Suite. This tutorial is an introduction to using Adobe Photoshop. Here you will learn how to get started, how to use the interface, and how to modify images with basic.
OPENING
Begin by opening Adobe Photoshop CS4.
On a PC, click Start > Programs > Adobe > Photoshop CS4, or click on the shortcut on the desktop.
GETTING STARTED
Begin by opening Adobe Photoshop CS4. In Windows, click on the Start button > All Programs > Adobe Photoshop CS4.
SETTING UP THE DOCUMENT
Setting up your document correctly from the start will make your job much easier as you work through your project. This will require some advanced planning. For example, if your final output will be a brochure, you may need to set up your document to be horizontal and double-sided.
To create a new document, click File > New. This will open the Document Setup dialog box
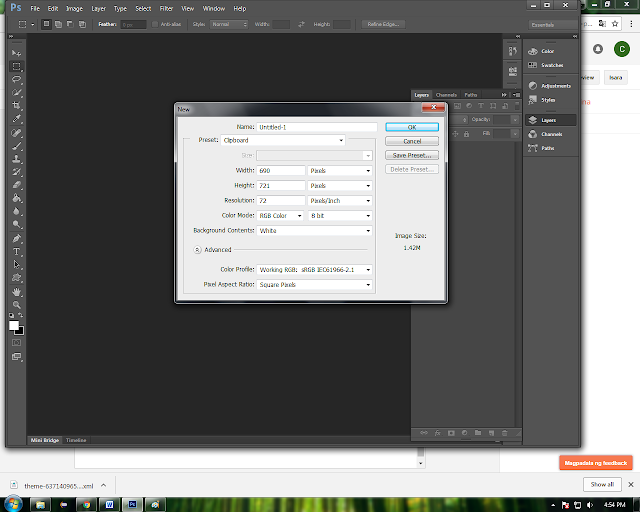
Here you will be able to name your file, set up the correct page size, and orientation for your document.
Page Size and Orientation
Change the page size by typing in new values for width and height. Page size represents the final size you want after bleeds or trimming other marks outside the page. In the Preset dropdown menu you can find such common sizes as letter, legal, tabloid, etc. Typing in exact values for Height and Width gives you more control over the size and orientation of your page.
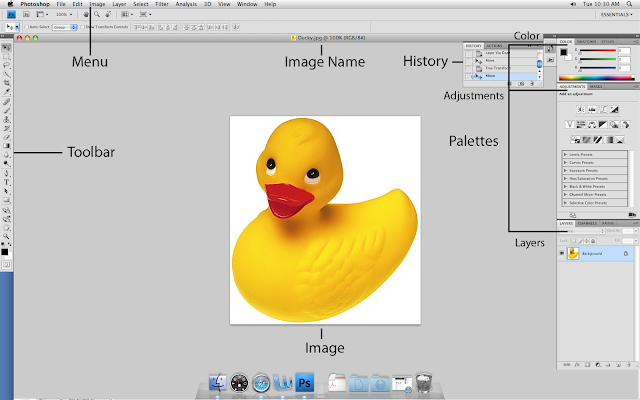
This is the layout of Adobe Photoshop interface.
Menu Bar
If you look at the top of the screen you will see the Menu bar which contains all the main functions of Photoshop, such as File, Edit, Image, Layer, Select, Filter, View, Window, and Help.
Tool Bar
Most of the major tools are located in the Tool bar for easy access.
The Image
The image will appear in its own window once you open a file.
Image Name
The name of any image that you open will be at the top of the image window as shown above.
Palettes
Palettes contain functions that help you monitor and modify images. By default, palettes are stacked together in groups. These are the palettes that are usually visible: Color, Adjustments, and Layers. If none of the palettes are visible, go to Window in the Menu bar and choose palettes you need to work with.
COLOR, SWATCHES, STYLE
The Color palette displays the current foreground and background colors and RGB values for these colors. You can use the sliders to change the foreground and background colors in different color modes. You can also choose a color from the spectrum of colors displayed in the color ramp at the bottom of the palette.
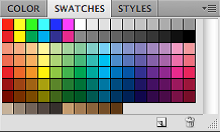 In the Swatches palette you can choose a foreground or background color or add a customized color to the library.
Adjustment layers give you the ability to apply an effect to a group of layers in Photoshop, and then you can edit that effect later, while preserving the original layers.
LAYERS
Layers let you organize your work into distinct levels that can be edited and viewed as individual units. Every Photoshop CS4, CS5, CS6 document contains at least one layer. Creating multiple layers lets you easily control how your artwork is printed, displayed, and edited. You will use the Layers palette often while creating a document, so it is crucial to understand what it does and how to use it.
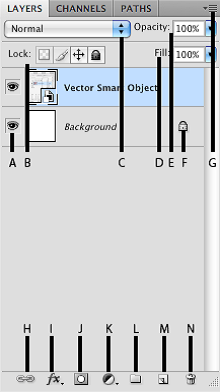 E) Opacity -By typing in a value or dragging a slider you can specify the transparency of the entire layer.
F) Layer Lock -The icon shows when the layer is locked and disappears when it is unlocked. Double-click the icon to unlock the layer.
G) Layer Options Menu -Click the black triangle to see the following options: New Layer, Duplicate Layer, Delete Layer, Layer Properties, etc. Some of the options are presented as icons at the bottom of the Layers palette.
H) Link Layers – Can be used to link layers together.
I) Layer Styles -If a layer has a style, an “F” icon shows at the bottom of the Layers palette. Click the little black triangle to see style options.
J) Layer Mask -A grayscale image, with parts painted in black hidden, parts painted in white showing, and parts painted in gray shades showing in various levels of transparency.
K) Layer Set -This option helps to organize images with multiple layers. Click the icon to create a folder for several layers.
L) Create New Fill or Adjustment Layer -Have the same opacity and blending mode options as image layers and can be rearranged, deleted, hidden, and duplicated in the same manner as image layers. Click the icon and select an option to create a new fill or adjustment layer.
M) Create New Layer -Click this icon to create a new layer.
N) Delete Layer -To delete a layer, select a layer in the Layers palette and drag it to the trash can icon; or, select a layer and click the icon.
Takes color samples from colors on the page and displays Tool them in the Color Boxes.
Select the tool, click on the color in the image you wish to sample. The Color Box will display this color.
Used to select and move objects on the page.
Click the tool button, then click on any object on the page you wish to move.
Select the tool, click on the part of the image you wish to erase. Drag to erase pixels
Select the tool. Choose a foreground color in the Color Box. Select an area you wish to apply the color to. Click the tool button, and then click on the selected area.
Select an area you wish to apply gradient to, click the tool button, choose a fill in the Options bar, click on the starting point, hold the mouse down and drag to the end point.
Blurs the sharp edges of an image
Select an area where you wish to apply the tool. Click the tool button, choose the Brush, Mode, and Strength. Drag the brush along the edges.
Drawing and Selection Tool
Types text on a page. Every time you click the Type Tool on a new portion of the page a new layer will be created.
Select the tool, click on the page and begin to type. You can specify the font and size in the Options bar. You can also resize and transform the text box by dragging the squares at the sides and corners. Use the Move Tool to move the text on the page.
Select the tool, click on the page, drag to draw a path. Click and drag the anchor points to modify the path.
Draws a rectangle shape. Other shapes that are hidden in this tool are: Rounded Rectangle Tool, Ellipse Tool, Polygon Tool, Line Tool, and Custom Shape Tool.
Select the tool, click and drag on the page to draw a shape. The shape will be automatically filled with the current foreground color.
Assisting Tools
Eye Dropper Tool
Select the tool, click on the spot on the page, hold the mouse button down, drag to move in the area.
Magnifies or reduces the display of any area in your image Glass Tool window.
Rotate View Tool
Rotates the canvas
Select this tool and click and drag outside of the canvas and the canvas will turn. Hold Shift to make sure that the canvas will snap to certain degree points.
Color Boxes and Modes
The foreground color appears in the upper color selection box and represents a color that is currently active. The background color appears in the lower box and represents an inactive color.
To change the foreground color, click the upper color selection box in the toolbox.
To change the background color, click the lower color selection box in the toolbox.
To reverse the foreground and background colors, click the Switch Colors icon (the arrow) in the toolbox.
To restore the default foreground and background colors, click the Default Colors icon (the little black and white boxes) in the toolbox.
NOTE: If you are using the Gradient Tool, the currently selected foreground and background colors will be the default colors of the gradient
Basic Image Editing
Now that you know how to find your way around in the Adobe Photoshop CS4 interface and are familiar with the most common commands, pallets, and tools, you can start doing some basic image editing. In the next few chapters of this tutorial you will learn how to crop, resize, correct, and sharp/blur your images.
Cropping
4. Resize the border by dragging the squares at the sides and corners till you are satisfied with the way your image looks.
Once you are completely satisfied with your cropped image, press ENTER.
CROPPING TO A SPECIFIC SIZE
If you wish to print your digital photos or other images on standard size photo paper, you will have to crop your images to a specific size, such as 8x10. To crop an image to a specific size, do the following:
1. Open the image you wish to crop.
2. Select the Crop Tool from the Toolbox.
3. In the Options bar, specify the values for Width and Height (Fig. 3).
4. Click in your image and drag the cropping border. Notice that the border is con strained -you cannot make it wider or longer than the specified values (Figure 4). For example, if you entered 8 for Width and 10 for Height, whatever size you make the border, the area within it will fit on an 8x10 photo.
Fig. 4. Cropping to a specific size
5. Once you are completely satisfied with your cropped image, press ENTER.
Resizing in Photoshop can help you print your images in standard photo sizes, resize and preserve the high quality of digital photos, and enlarge small images to a poster size.
RESIZING TO A SPECIFIC SIZE
To resize your image to a preset size, follow the steps below:
1. In the main menu, go to File > New.
2. In the New dialog box, click on the Preset dropdown menu. You will see several preset sizes, such as 2x3, 4x6 and 5x7 with the preset resolution of 300 ppi (Fig. 1).
Fig. 1. Preset size in the New dialog box
3. Choose the size that you wish and click OK.
NOTE: All the preset sizes are in portrait orientation. If you wish to resize an image with the landscape orientation, you need to create your own preset. To create your own size, do the following:
1. Type in the values for Width and Height, for example 7x5.
2. Type in your desired resolution (150 ppi is enough for high quality printing, and 72 ppi is good for the web images).
3. Click the Save Preset button


